
Now let’s use Pods to add some fields to the WordPress user profile that we will need in our directory. While WordPress’ built-in user profiles offer only limited fields, Pods will allow for pretty much anything we need to be added to profiles. Pods allows us to use the same list of custom fields to extend users as with any other content type.
Contents
Field Types
Plain Text Field
- Street Address Line 1
- Street Address Line 2
- City
The first type of field we will work with is a “Plain Text” field. This is fairly straight forward, easy to use, one-line text input field. Create three of these called: “Street Address Line 1”, “Street Address Line 2”, “City”.
Advanced Fields
As you probably noticed, we didn’t use plain text fields for the rest of the fields. By using an advanced field type Pods will automatically validate the input according to the specific needs of a type of data. We will be using several good examples of these types of fields in the next few steps.
Number Field
- Zip Code
To complete the mailing address, add a field called “Zip Code” and use a “number” field. This field will use Pods’ data validation functions to ensure that only numbers are used and will help with formatting the output.
Relationship Field
- State
Next, create a field called “State.” For state we will use a specific type of relationship field, which will allow us to select from a list containing items from the related content type. Relationship fields can be related to anything from a custom defined list, other types of posts, or a predefined list, such as the list of US states that we are going to use now. Once you set your field type to “relationship”, a second drop-down menu will appear listing all of the various types of relationships you can use. Select the very last item “US States.”
Phone Field
- Phone Number
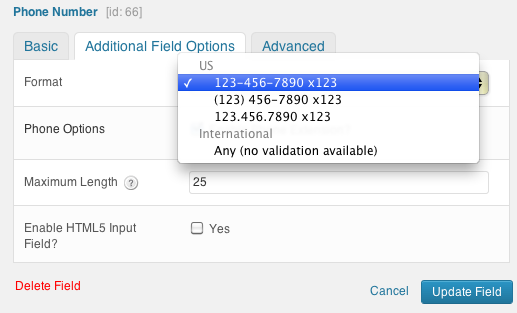
Just like when we choose to use a number field for zip code to ensure that the right type of data input is inputted, for our next field, called “Phone Number” we will use a “Phone” field. While we could have used a regular number field, a phone field allows for special formatting and ensuring that we get the right number of digits. Pods also gives us the option to have no validation or formatting, which allows for entry of international numbers. You can choose if you want to check the “Enable Phone Extension” box or not, depending on if it is needed or not.
Avatar Field
- Picture
The next type of field we will use is an “Avatar” field. This will allow us to upload a picture for the user, to be used in place of their Gravatar. The “Avatar” field type is shown for User pods only, and it overrides the get_avatar() with whatever file is uploaded. Call this field “Picture.” Under the “Additional Field Options” tab you can select if you want to use the WordPress Media Manager for handling these images or not. If you choose to use the media manager, you will be able to select from the media manager and use it to upload new images. Be careful with this setting, as it could give access to the media manager to users that you don’t want to have access. For this reason you may wish to choose to use the Plupload as your uploader to force users to upload a new image from their computers.
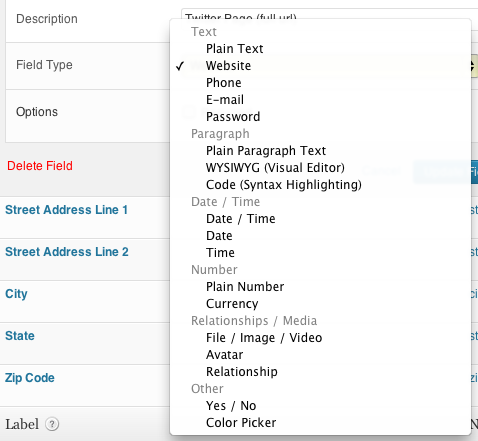
Website Field
- Twitter Profile
- LinkedIn Profile
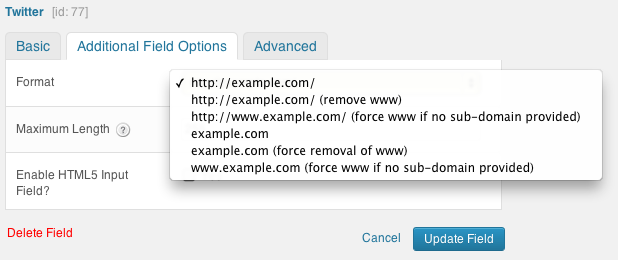
The last type of field we will use is a “Website” field, which we will create two of: “LinkedIn” and “Twitter.” For these two fields I suggest filling in “Description” in the basic tab with instructions like “LinkedIn Profile (full url).” Website fields have several options for formatting the link under the “Additional Field Options” tab. The various options can force “www” or the transfer protocol to be added or removed. I prefer to keep this on the default option.
Access Options: Backend
Depending on how you are going to use this directory you may or may not want to allow users to edit some or all of these fields. From the “Advanced” tab for each field you can choose to restrict access to admins, or by role. If you are restricting access, you might want to check “Hide field from UI” to prevent users from seeing these fields in their profile entirely or “Make field ‘Read Only’ in UI” so they can see the values, but not edit them. If you are using the Roles and Capabilities component restricting access by role will be very useful for you. When you select “Restrict access by Role?” you will see a list of all roles, with checkbooks to give them access to editing the field. If, for example, you have created a role on your site called “secretary” to correspond to a role in your organization of the same name, you will probably want to check the “secretary” and “admin” roles. You set these options on a field by field basis, so you can set access selectively if you need to. For example, in an employee directory, you may want to let your employee’s edit their personal info, but not a field like “Job Title” or one that changes their access to other information on your site.
Continue to Step 3: Reorder Fields to See Them in Action
